Video
Essential Filmmaking Gear – The Solo Gig.
In aviation, an MMEL (Master Minimum Equipment List) is a categorized list of on-board systems, instruments and equipment that must be operative in order to flight. Any additional equipment not included in the MMEL may break temporarily, but it won’t make the aircraft inoperative. For several years I’ve been attempting to create my own MMEL for “hybrid” productions. My simplest definition of “hybrid” is “productions or assignments where a skeleton crew (from one to four people) is required to produce, direct, shoot video and stills, record sound, and even edit. Most of these assignments will be happening on location, more often than not over several days.”
Like it or not, these gigs are becoming increasingly popular. It sounds crazy and indeed, being on the field trying to wear so many hats at the same time can be extremely stressful. The keys to make these projects run smoothly (and even fun) are simple: invest as much as possible in pre-production, bring only the most essential gear, know your equipment well, and be decisive.
Regarding gear, a substantial challenge is how to pack and travel as light as possible while carrying a full production and post-production setup that is literally on your back, so “essential” in my book is something you will use all the time, not “maybe, just in case, what if.”
Over time, we have created three “lists of essential items”, depending mostly on the crew’s size. When possible, I added the product’s link to Amazon and/or B&H for your convenience.
List #1 – The Solo Gig
Hybrid Assignments
One-Man Crew
Example: Japan.
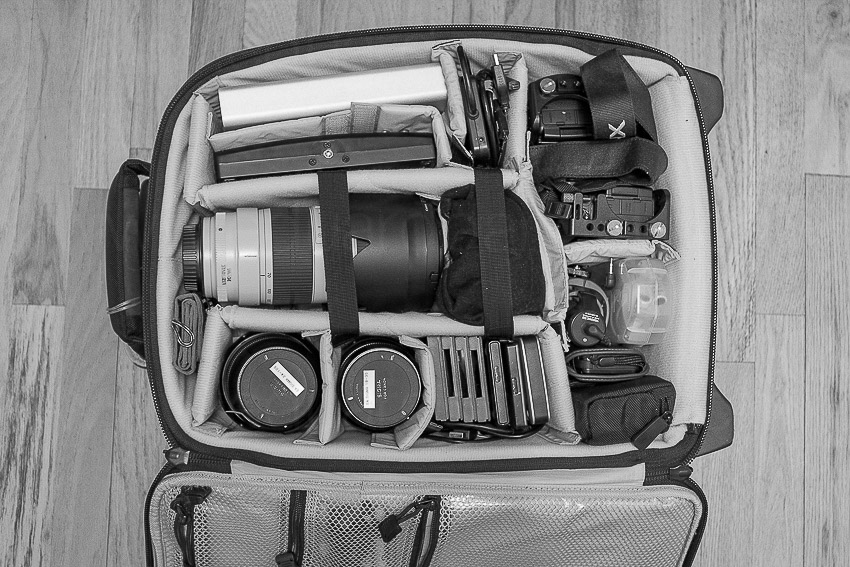
When working and traveling alone, a single carry-on backpack (like a Tenba Roadie Hybrid bag) contains every item I’ll need for up to three days, except some clothes and toiletries that will go on a smaller backpack the gets checked in or shipped in advance.
Hardware & Software:
1. A small, light and versatile Camera (“Cam A”) to shoot video. In the photo I have a Panasonic GH4 (Amazon and B&H), but I also like the Sony a7R II (Amazon and B&H).
2. A second camera (“Cam B”) to capture stills and B-roll, ideally identical to Camera A. Having the same brand, model and firmware can save you a lot of time in post. Plus the batteries, chargers, media and lenses are the same.
3. I like to carry a third (even smaller) camera for location scouting and behind the scenes stills. My weapon of choice is the Fuji X100s (Amazon and B&H). A compact camera is especially handy after a very long day, when I don’t want to carry more gear but still want to capture a few night scenes of nice-looking dishes during my evening meal. Here’s my original X-100s review. Believe it or not after all these years, I’m still using (and loving) this camera.
4. Two or three lenses. In this case I’d bring a Lumix 12-35mm 2.8 lens (Amazon and B&H) and a Lumix 35-100mm 2.8 lens (Amazon and B&H). I like these lenses because they are the equivalent to a 24-70mm 2.8 and a 70-200mm 2.8, but extremely small and light, yet very sharp and fast (2.8 all the way.)
5. For sound I’d bring a field recorder like the H4n (Amazon and B&H) or a more current model and smaller version like Tascam’s DR-05 (Amazon and B&H) to capture interviews and my own production notes.
While like the versatility of the H4n, it is bulky and too slow to start up, so we are considering something newer like the Zoom H1 (Amazon and B&H). I probably would also add at least one Rode VideoMic (Amazon and B&H) to capture soundscapes and decent scratch sound for interviews. And of course, we need to add good headphones to our audio package. (Amazon and B&H).
6. Two (2) G-Tech 1TB external portable hard drives (Amazon and B&H) and one (1) compact, super fast and awesome 6TB G-Tech External Hard Drive (Amazon and B&H). And by the way, I ONLY trust G-Drives, even if they fail every 14years.
7. A 15″ MacBook Pro (Amazon and B&H) with Adobe’s Creative Suite (Amazon and B&H) and Shot Put Pro. Here’s an article on how we use this software to backup our media on location.
8. A small tripod (Amazon and B&H). This thing is worth its weight in gold. I’ve used it for time lapses, low angle shots, as a handheld rig, car mount, microphone stand, and even to attach small lights for quick interviews. Priceless.
9. Benro S4 Video Monopod (Amazon and B&H). It’s small, relatively light, and sturdy. Works great.
10. A variety of Tenba Tool Boxes (Amazon and B&H) to pack all the batteries, chargers, cables, adapters and other small accessories. At first, they might seem a bit bulky but having everything neatly organized and protected is worth it.
11. One of my favorite photo bags ever, the new Tenba Shootout (Amazon and B&H). It is small enough to meet carry-on size limitations, but large enough to fit my most fragile and essential items. Plus, it is extremely comfortable.
12. In terms of lighting, for these assignments I try to use mostly available/natural light, but I always bring a 5-in-1 collapsible reflector (Amazon and B&H)
13. Two ND filters are essential when shooting daylight exteriors. By the way, we recently found out how to save $250 per filter.
14. Media pouch with ten 64GB SD cards (Amazon and B&H).
15. X-Rite’s Color Checker Passport Video (Amazon and B&H). If you get into the habit of using for a few seconds during production, it will save you hours in post. Guaranteed.
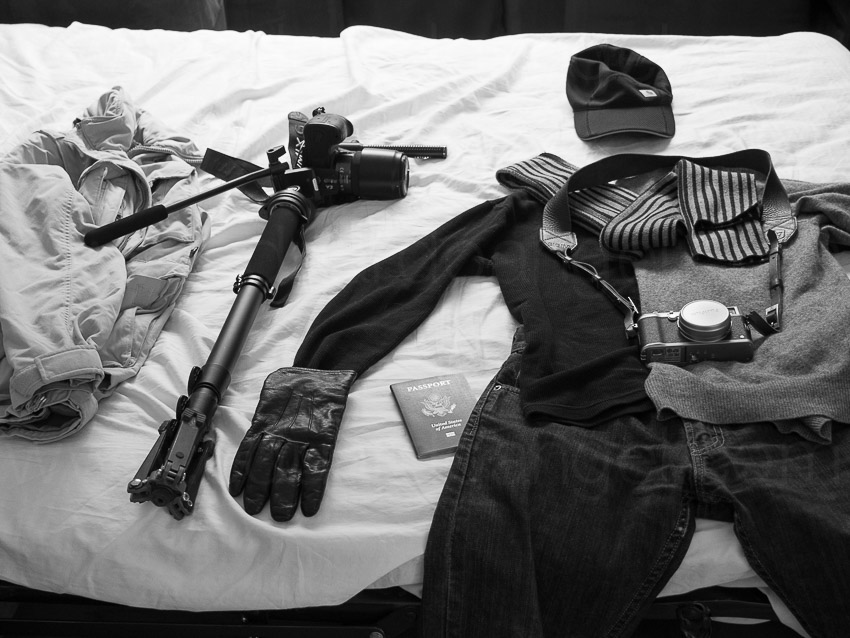
Miscellaneous Items:
1. Obviously, the most important tool if you are crossing any borders: the passport. This website compares the “power” of passports from many different countries, and, as Americans, we are blessed to have the most powerful one.
2. My good ol’ Columbia jacket/vest has been traveling with me to more than 40 countries. It has lots of pockets, a hoodie, and because it has a self-stowing pocket, it sometimes doubles as a pillow on the road. A priceless item, to be sure.
3. Media credentials which sometimes (but not always) can give you special access, get you discounts and the most important part, allow you to travel with some heavy or oversized gear without paying a fortune. Here’s a link to Delta, American, and United Media Baggage policies.
4. A hat, sunglasses and sunscreen — truly essential items.
5. I like to dress in layers and in dark colors when shooting on the road. Black hides dust and stains very easily. A cashmere sweater is worth its weight in gold, well perhaps even more.
6. I always bring gloves unless I’m going to the Caribbean in July, comfortable shoes, and plenty of granola bars.
What else do I bring with me? Here’s the complete list.
As you can see, anyone involved in run-and-gun, single-operator scenarios like weddings, events, corporate shoots, documentaries, red carpet premieres, product launches, sporting events, video podcasts, and even student films could benefit from these lists, so feel free to share them.
We also have produced several Filmmaking courses on Lynda.com, two of them specifically designed for photographers transitioning into video. Check them out!
Are you working with a small crew constantly on the move? In that case here’s our List #2 – The Moving Crew.
Video
Creating the habit of backups.
Creating a new habit isn’t easy. We all know that. And I’m not talking about major changes like exercising more, eating better, or working less, but simple things like backing up our projects, especially when working on locations. The “I’ll do it later” or “this is not a good time” will always be there so by incorporating simple and efficient practices into our standard workflows can make things much easier and eventually save a project or even a client.
ShotPutPro, currently on its fifth version is an application known to many in the film industry. What I find interesting is that even some of those who know about the app and totally get its importance skip the critical backup step. This article covers how we use ShotPutPro on location.
First, we label each and every card, not only with a label (which could fall off) but also by giving each card a unique name. Since we are almost always using two cameras, we name a 64GB card as A1 and a second card with the same exact capacity (64GB) as B1. The same goes for A2 and B2, and so on. When we are replacing a card during a shoot, say C1, we also replace C2, even if there’s space left. This might seem wasteful but it keeps the data wrangling much smoother. After 10 hours, two or three cameras, and several cards, it is very easy to forget what has been dumped and what hasn’t.
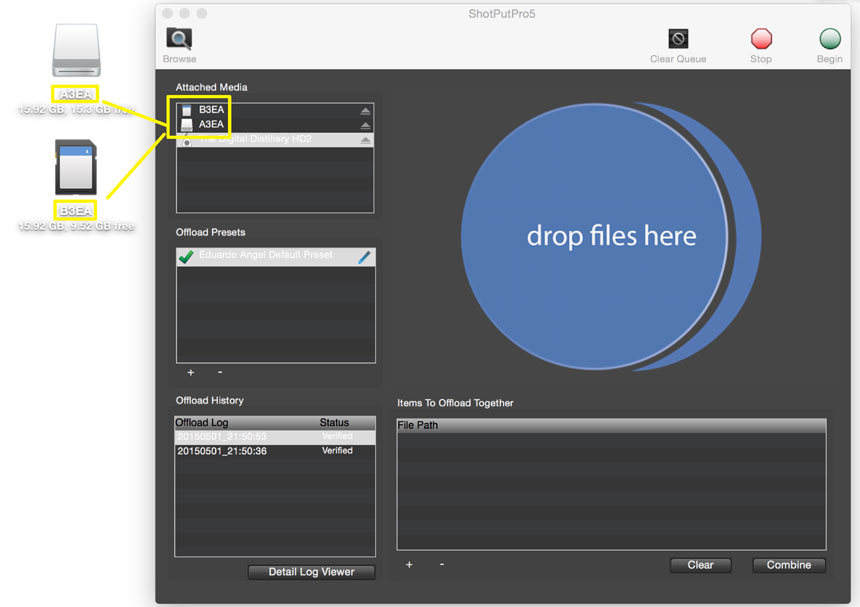
As you can see the cards have a unique name that shows on the computer’s desktop/finder as well as in ShotPutPro
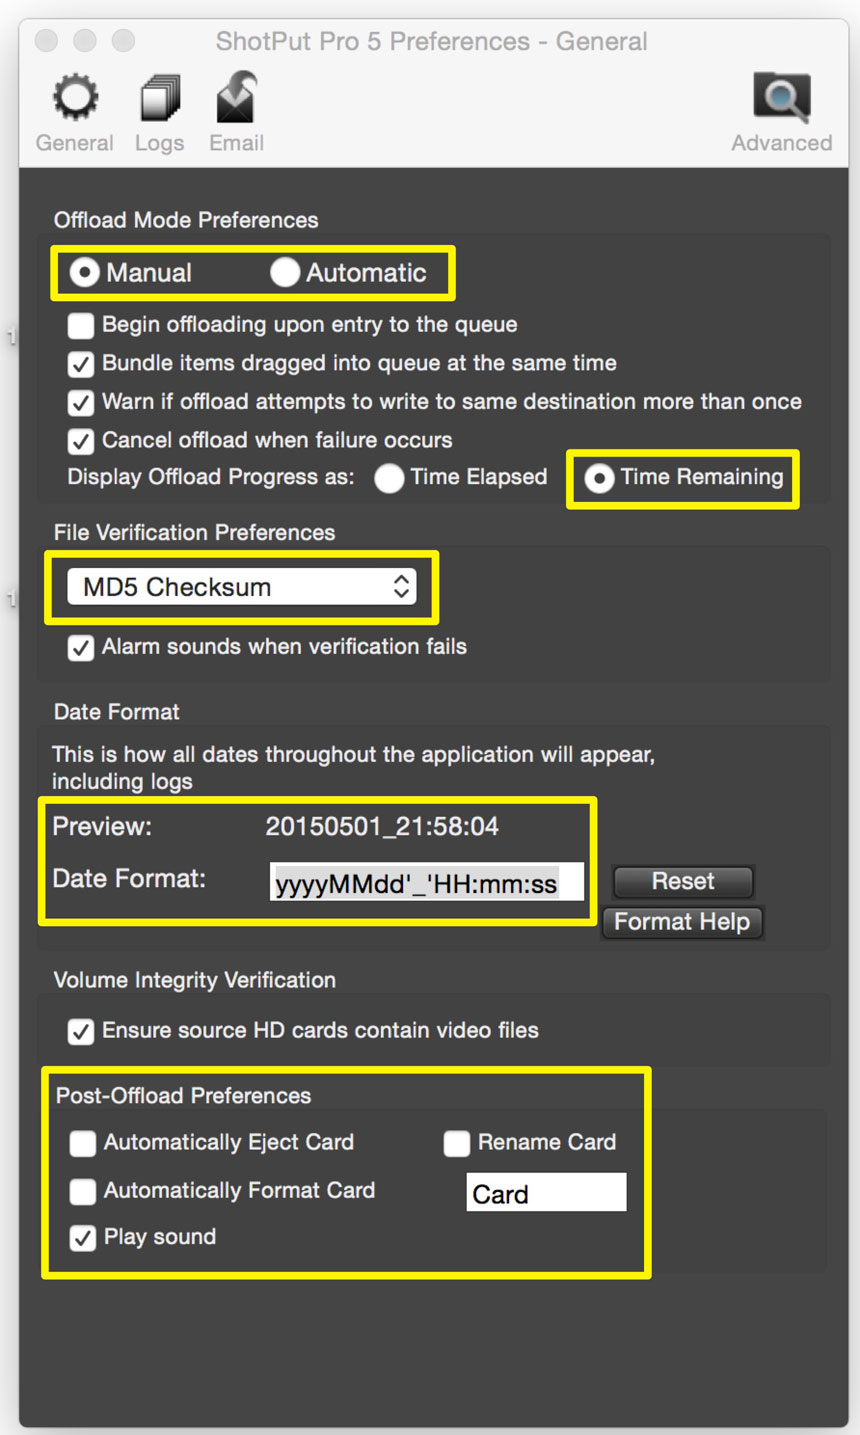
Under Preferences, there are several options but the most important ones for us are:
Manual vs Automatic. I prefer Manual, which means I have the option to choose when to start the data transfer. If Automatic is selected, as soon as the application detects a Hard Drive or Memory Card it will start the process.
Under Display Offload Progress I prefer to see how much time will it take to be done. That way I know if I can grab something to eat or do something else or simply sit next to the computer and wait a little longer.
Under File Verification Preferences MD5 Checksum is the most current standard.
I like to use the following format for dates: year/month/day/time in the 24 hour format. So, for example, it would read 20150520_211037.
Under Post-Offload Preferences we have everything disabled except “Play Sound.” I’ve been doing this for years and I still don’t feel comfortable formatting the card right away. You might feel differently.
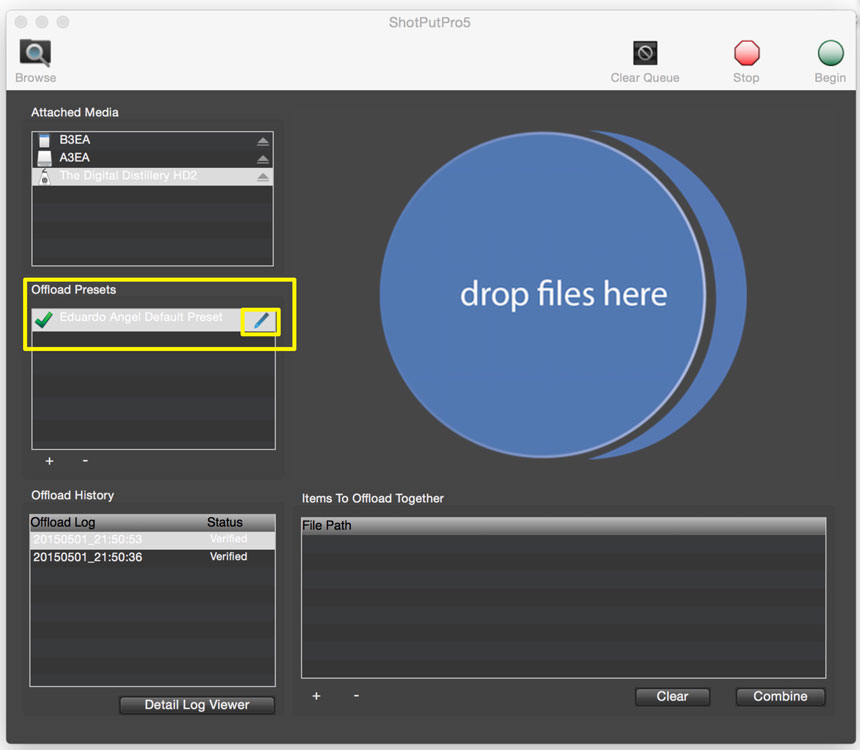
Back to the main window. Under “Offload Preset” click the little pencil to edit the preset.
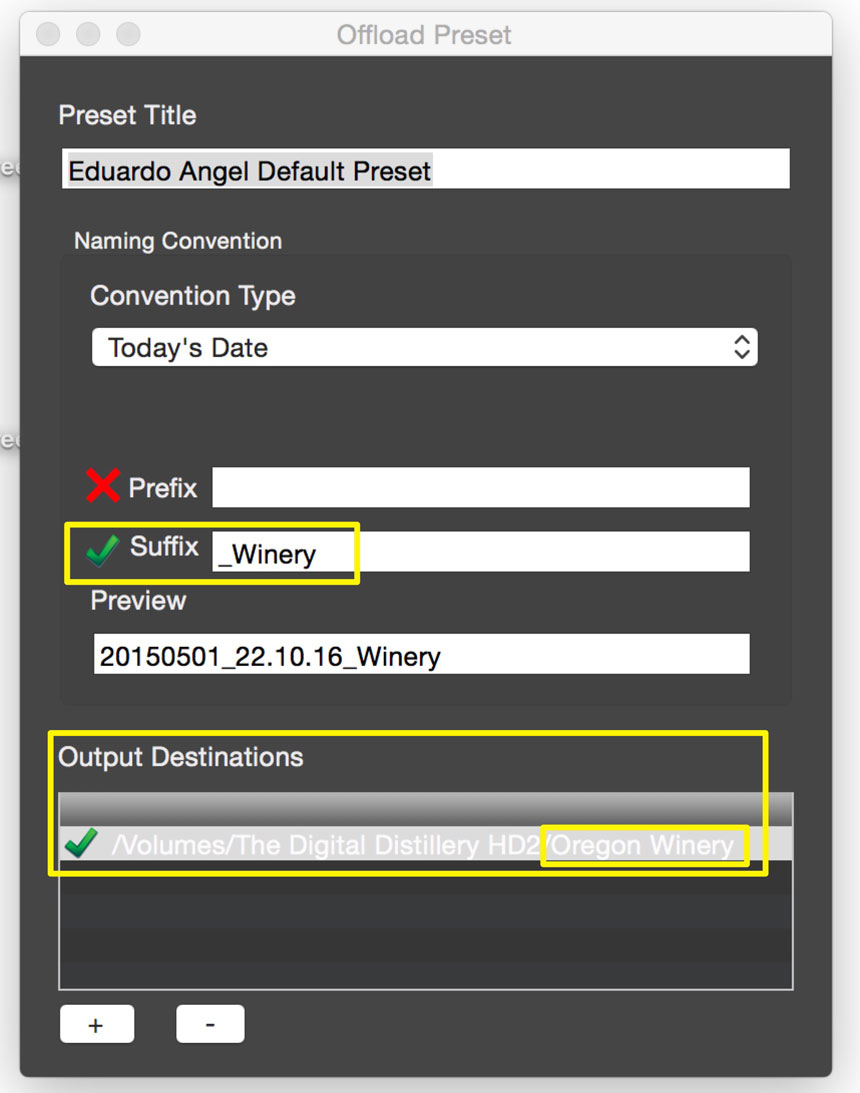
This is how our Main Preset looks.
We change the “Suffix” based on each project.
The Output Destination also changes from project to project, simply click the + sign to select an external hard drive / folder /subfolder for your backup.
ShotPutPro can back up to (apparently) endless destinations so you can select two or three hard drives to have multiple copies with a single click.
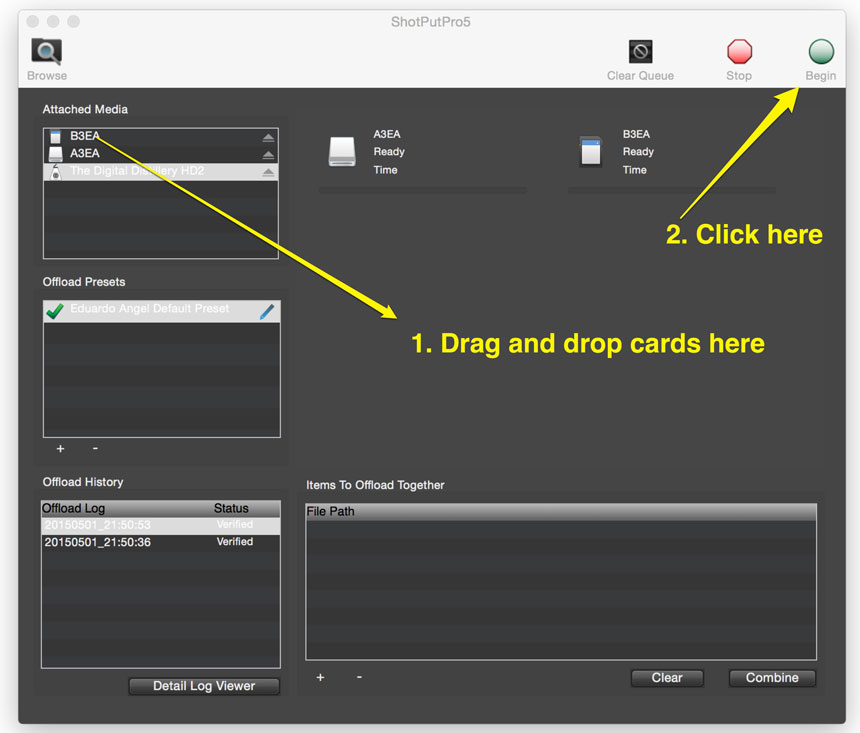
Now, this is the magical moment. Simply drag and drop your Hard Drive or Memory Cards into the “Drop Files Here” circle. Then click the “Begin” button on the top right of the menu.
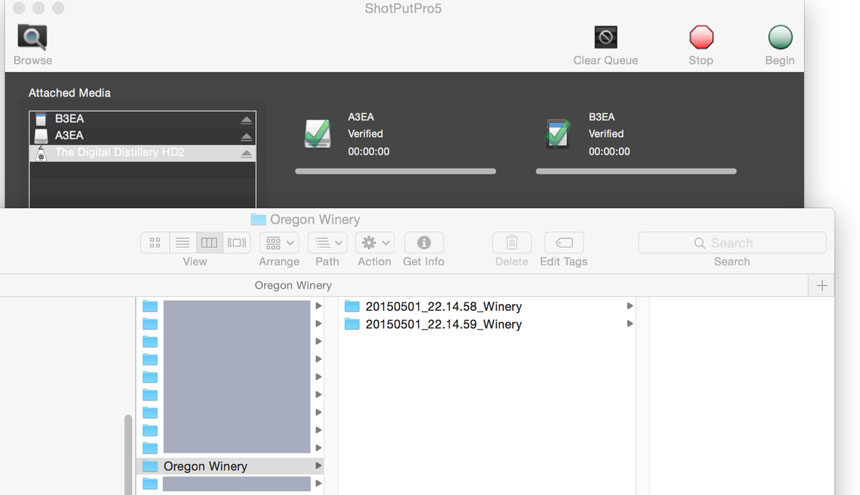
Done and done. ShotPutPro created a folder per memory card with the date and exact time of the backup.
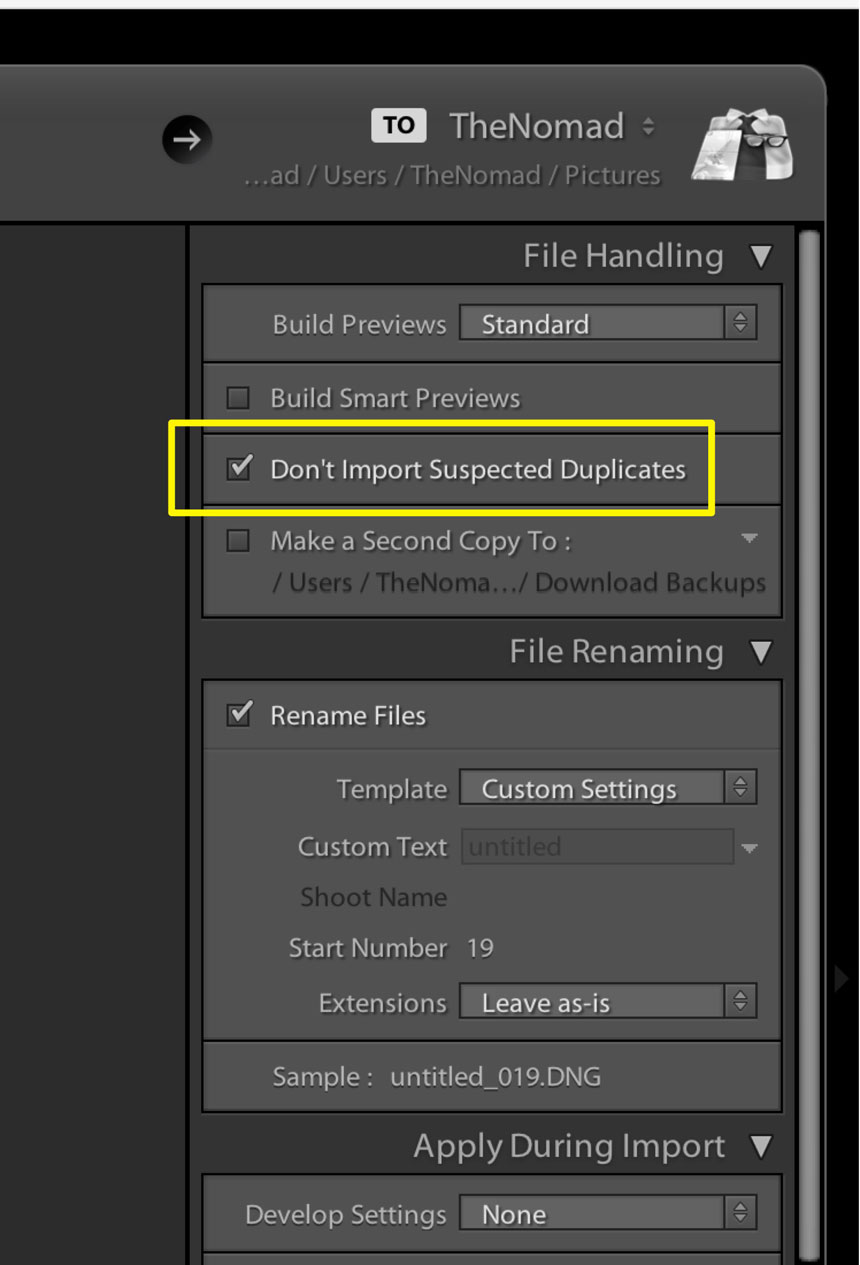
A weakness in this app is that if we try to backup the same card again, even to the same destination, it will let us. I’d prefer if it had a similar feature as Adobe Lightroom to “prevent importing suspected duplicates,” but it doesn’t, so once you backup a card I strongly suggest you put it away, grab a fresh one, and keep shooting.
That’s all for now. I hope this helps you. If you have questions or suggestion for similar upcoming articles, feel free to contact me here or here.