Photography
How to Color Correct for Skin Tones.
I have found that careful attention to basic color correction principles can help re-calibrate our subjective evaluation of an image to a point where effective adjustment choices can be made. I also find it extremely helpful to get as much practice as possible working on other people’s images, as this helps us become more objective about our own work! I have the good personal fortune of benefiting from the work of my fiancé, the amazing Bobbi Lane, who happens to be a really extraordinary portrait photographer! I will examine my decision making process in a recent color correction of one of her images in this post.
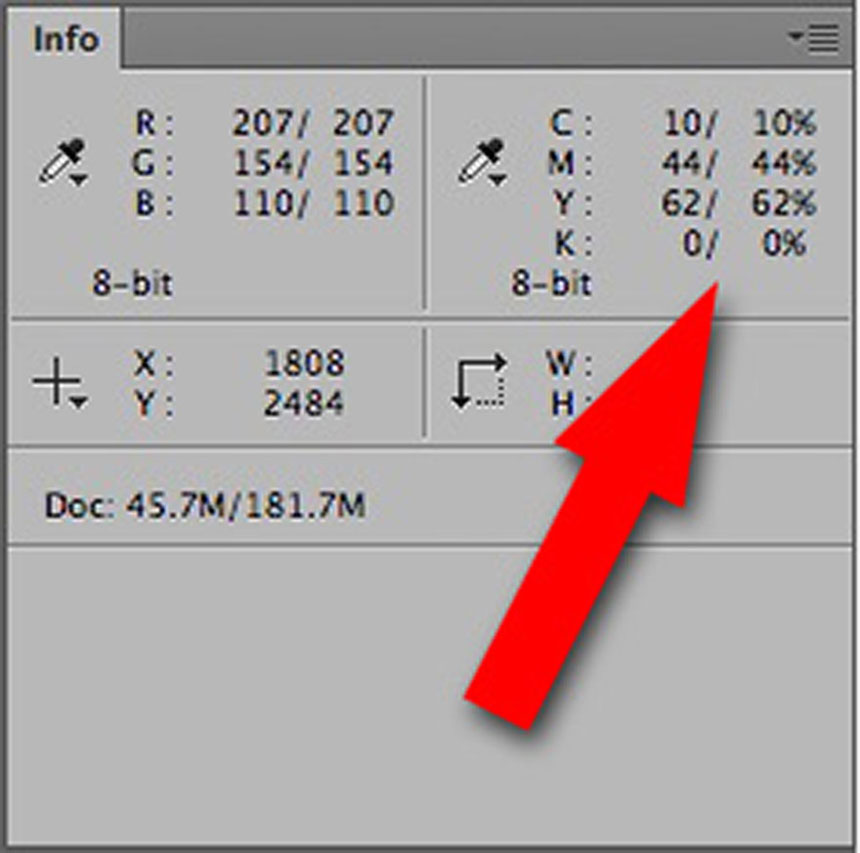
The original image is on the left with the final corrected version on the right. The original isn’t horrible, but it suffers from what I call “pumpkin skin” – just a bit too saturated an orange color. I always use the info panel numbers in Photoshop to help me decide how to approach color correction. The key to evaluating a skin tone is to look at the CMYK numbers at the upper right of the info panel. A good skin tone is all about the ratios of CMY in the secondary color readout. Ideally, yellow and magenta should be closer to each other than either is to cyan – cyan should be between 1/3 and 1/4 of the average value between yellow and magenta, and yellow should be a little higher than magenta – for a fair skinned blond, about 10% higher!
The screenshot above shows a reading from the skin color at the chin – there are two columns of numbers here because I had already added a Curves layer when I did the screenshot, normally there is only one for RGB and CMYK. The two columns are identical at the moment because no adjustment is being made, this allows you to compare adjusted with non-adjusted numbers. As I said, the cyan should not be much lower than 1/4 of the average between magenta and yellow. In the numbers above, that average would be 53 – cyan at 10 is just a little low, not horribly low, but that combined with the slightly elevated yellow (relative to the magenta) confirms my suspicion that the skin is just too colorful. In fact, this skin color is very reminiscent of an artificial tan, spray-on type of color that is sometimes used by body builders in competitions!
In order to correct the skin I want to affect the RGB numbers to get the ratios in CMY to change. If we look straight across from the top row of numbers we can see that R lines up with C – if I want the cyan value to go up, I need to do the opposite to red, the red value has to go down! In this image the red channel is very pale (a higher number in the info panel) if I want the red value to go down, I need the red channel to be darker in the area of the skin)a lower number). I could potentially use a Curves adjustment, targeting a point on the skin, but this point is very high up on the Curve so it will be harder to lower it without adversely affecting other tones.
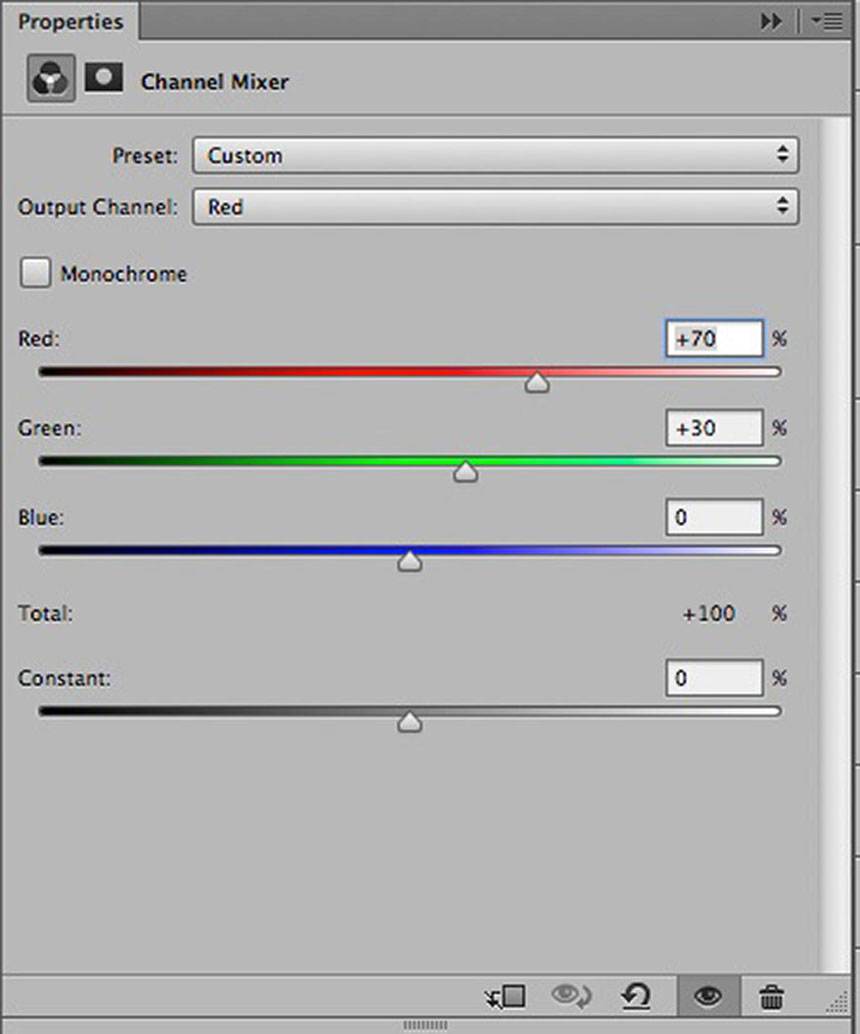
The trick is to blend in the darker skin tone from the green channel using a Channel Mixer adjustment…
Here 30% of the green channel is blended into the red, replacing part of the red channel to darken, or lower the red value. This sets up the image for the final adjustment, a Curve adjustment raising a point in the blue channel to lower the yellow value just a little bit, resulting in a pinker look to the skin, and a better CMY ration in the color. To see a more detailed step-by-step tutorial on this process go to my original blog post on the subject.
I am teaching all about color correcting for skin tones as part of my Portrait Retouching Intensive at Santa Fe Photo Workshops June 21 & 22nd – sign up here!


